


SHREDDED METAL
ARPEGGIO MADNESS!
In the current high-tech metal climate, being able to sweep-pick arpeggios all over the neck is an important tool to have at your disposal. For this column, I’m going to show you three basic shapes for sweep-picking a minor arpeggio, and then I’ll explain how you can join these together to create a larger arpeggio shape. Keep in mind though that these are essentially just exercises – sweeping up and down arpeggios ad-nauseum isn’t particularly musical. It’s how the arpeggios are phrased, the choice of notes, how they outline chords, and all the other notes surrounding them that will make sweep-picked arpeggios sound good and convey a sense of musicality.
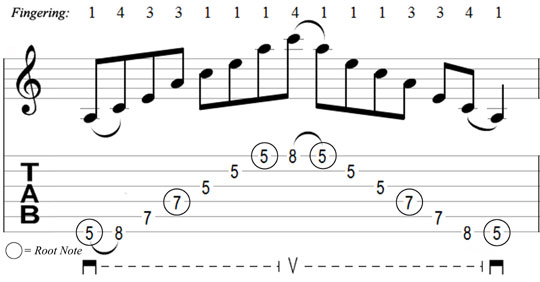
EXERCISE 1
The following arpeggios are all minor (formula: 1-b3-5) in the key of A minor. Essentially, all you’re doing is playing the first, third and fifth note of an A minor scale (A-C-E). The first shape stars with a hammer-on as the right hand sweeps across the strings in a fluid downward motion. Roll your third finger on the fifth and fourth strings to prevent the notes from ringing together. You also need to roll your first finger on strings three, two and one. When you get to the eighth fret on the first string, switch your right hand to an upstroke and pull off with your pinky. Then continue with an upstroke as you complete the previous steps in reverse. For all these shapes I’ve included the suggested fingerings as well as the root notes (which you should memorise).
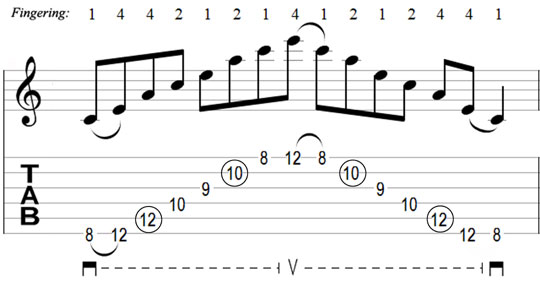
EXERCISE 2
The second shape is an A minor arpeggio in first inversion – you’re playing the same notes but starting on the next note of the chord after the root note (the minor third which is C in this case). As with the previous shape start with a hammer-on and sweep downwards, then use a pull-off on the top string before sweeping upwards. It’s more common to start this shape on the fifth string root note, so feel free to practice it like that as well.
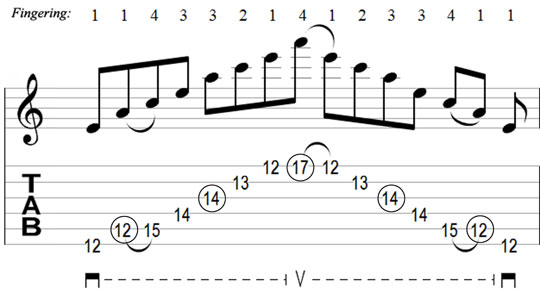
EXERCISE 3
The third shape is A minor in second inversion (starting on the fifth degree). Start by rolling your first finger and then doing a hammer-on on the fifth string. Sweep downwards while rolling your third finger on strings four and three. A wide stretch pinky pull-off at the top brings you back down as you sweep upwards, once again rolling on strings three and four. As with shape two, it’s typical to start this one on the fifth string root note.
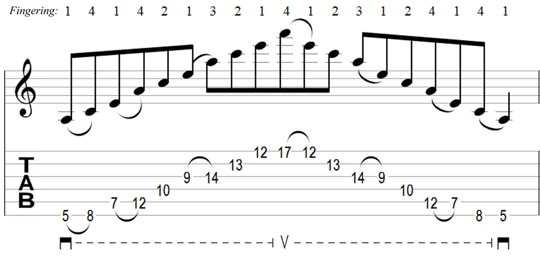
EXERCISE 4
Once you have these three shapes mastered, you can experiment with joining them together to create larger and more complicated shapes and patterns. There are numerous ways to do this. For example, you could slide from one shape to the next, loop certain sections, use right hand tapping, etc. For this exercise I’ve started with the first three notes of shape one. A wide-stretch hammer-on on the fifth string moves it to the second shape. Another hammer-on on the third string moves it to shape three. Even as you hammer-on, the right hand is still sweeping downwards, only resting briefly on the next string. The process is then completed in reverse from the first string using pull-offs and an upwards sweep. What you get is an A minor arpeggio covering three octaves!
Practice these arpeggios in different keys, and try moving them as high up (and down) the neck as possible. You could also raise the third degree a half step and work out the major shapes as well. Additionally, try joining them together yourself to create larger sweep-picked arpeggio lines. Just remember to keep it musical!